

An IMS guide to one of Zoom’s Top Features
As many teachers know already, there are so many great aspects to Zoom that make using it for the virtual classroom so much easier. From Waiting Rooms to Passcode Protection and Screen Sharing options to Meeting locks there are an array of brilliant features that Zoom has created and another one of these is the very popular Breakout Rooms.
Small group learning is a crucial part of education and whilst many may think that in a virtual classroom the teacher has to do all the talking, thanks to Breakout Rooms, students can engage and collaborate with each other in smaller groups just as they would in a traditional setting.
Just like with any new concept, there are some fantastic tips and tricks to be learnt when it comes to using this popular feature of Zoom that we at IMS would like to show you below.
Breaking down Breakout Rooms….
First, let’s begin with what are Breakout Rooms? Put simply, Breakout Rooms are a feature that allows you to split your Zoom meeting or class up into 50 separate sessions.
The meeting host or in the case of a virtual classroom a teacher can then choose to separate their students into these Breakout Rooms either automatically or manually, or they can allow them to select and enter breakout sessions as and when they want.
In a traditional classroom setting breaking into smaller groups is a great way to create more focused discussions and with Zoom Breakout rooms that same environment is possible in a virtual setting too!


For those taking part in a Breakout Room, it’s good to know that they have similar capabilities as they have in a regular Zoom meeting. These include Screen Sharing, In Meeting Chat and asking the host for help.
Because of it’s popularity, Zoom are also constantly adding new functionality to Breakout Rooms so they can offer the best experience for users including Self Select Breakout Rooms where students can choose which Breakout Room they want to join and then move freely between rooms without needing the teachers help.
That’s just one great function Zoom have introduced, let’s take a look at some more in detail….
From the Top…
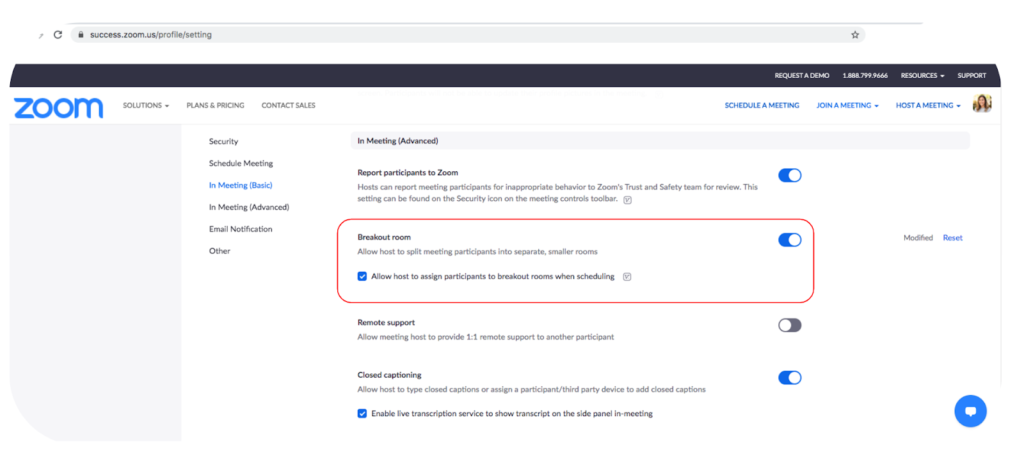
For you beginners let’s look at how you can enable a Breakout Room. Simply log on to zoom, sign in and then go to your Account Settings. Under In Meeting (Advanced), you can enable the Breakout Room feature. Once enabled, you can create breakouts during your virtual classroom by clicking on the “Breakout Rooms” icon in the lower right-hand side of your toolbar. If you cannot access the option to enable Breakout Rooms, contact your system admin and ask them to enable it.
All good things come to those who wait…
Just like with any of the other great Zoom features knowledge is the key to success here and learning about Breakout Rooms will take a little time. However once you and your students master Breakout Rooms they will help create a fantastic atmosphere in your virtual classrooms where you and your students can enjoy the great sense of school community and student communication that is so important when it comes to learning.
So as well as learning the basics yourself, you will also need to give your students the tools they will need to interact with Breakout Rooms, after all this is a learning experience for both the teacher and the students.
Start out with short Breakout Rooms, that way students will be more focused on the task at hand with a clear guideline of what is expected of them. 5 minutes is plenty of time for students to discuss the topic at hand before reporting back to talk about their ideas and questions.

Don’t forget to remind your students to unmute when they are using Breakout Rooms so they can interact with each other and take part in the smaller group discussions. Make sure to remind them to turn on their cameras too as this makes for a more positive and engaging experience for the group.
Tell your students to introduce themselves and remind them to sign off at the end too. Another good idea is to give your students a prompt with a sentence starters which will help give them a clear indication of what you want from them and will also help get the ball rolling in the small group setting.
A shared slide or template they can fill out together can also be good inspiration for students to get the creative juices flowing as can assigning different roles within a group setting so that everyone has a place and a job to do within the group.
Another nice idea is to ask for feedback from students who can acknowledge other students in the group that they learned something from or were particularly helpful or knowledgable with the particular task assigned.
Ask not what your group can do for you….
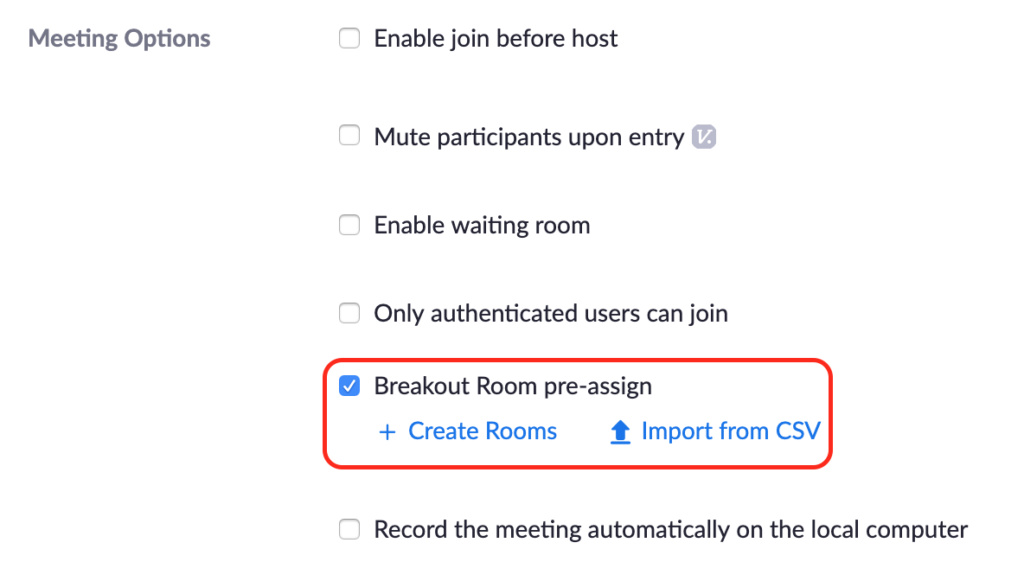
As a teacher you can pre-assign Breakout Rooms when scheduling a meeting or class. This option is great for hosts who already know how they want to group their participants.
To schedule it ensure that the “Allow host to assign participants to Breakout Rooms when scheduling” option is enabled. Then go to Meeting Options and enable the “Breakout Rooms pre-assign” option. You can then select “Create Rooms” to set up rooms and assign those taking part in the class manually using their email address or “Import from CSV,” which provides you with a CSV template to which you can add your Breakout Rooms and participants.
If you want to title each Breakout Room just click on the Breakout Room of your choice and then click the pencil icon, which will then allow you to rename the room, for example ‘History Study group 1’ etc.
Once you’ve created your Breakout Rooms and assigned those taking part just click Save before continuing to schedule your meeting.
Creating Breakout Rooms within a meeting: To do this go to the meeting toolbar, here you can click on the Breakout Rooms icon and access the following options to manage Breakout Rooms.
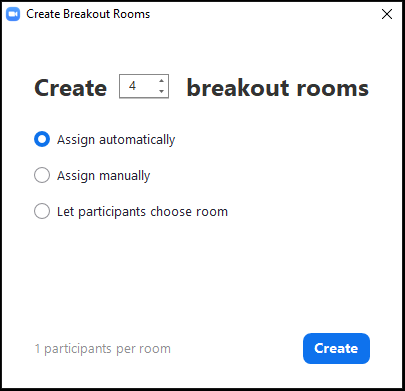
Automatic vs. manual room creation: Automatic room creation will create your Breakout Rooms automatically, putting those taking part into rooms randomly or placing them into their pre-assigned rooms. The Manual room option allows you to create each room and assign participants to each room individually. To move a student, simply select their name and assign them to a different room.
Delete room: Use this option to delete the Breakout Room you have selected, but just remember this won’t remove the participants in that room from the class completely.
Keeping your options open…..
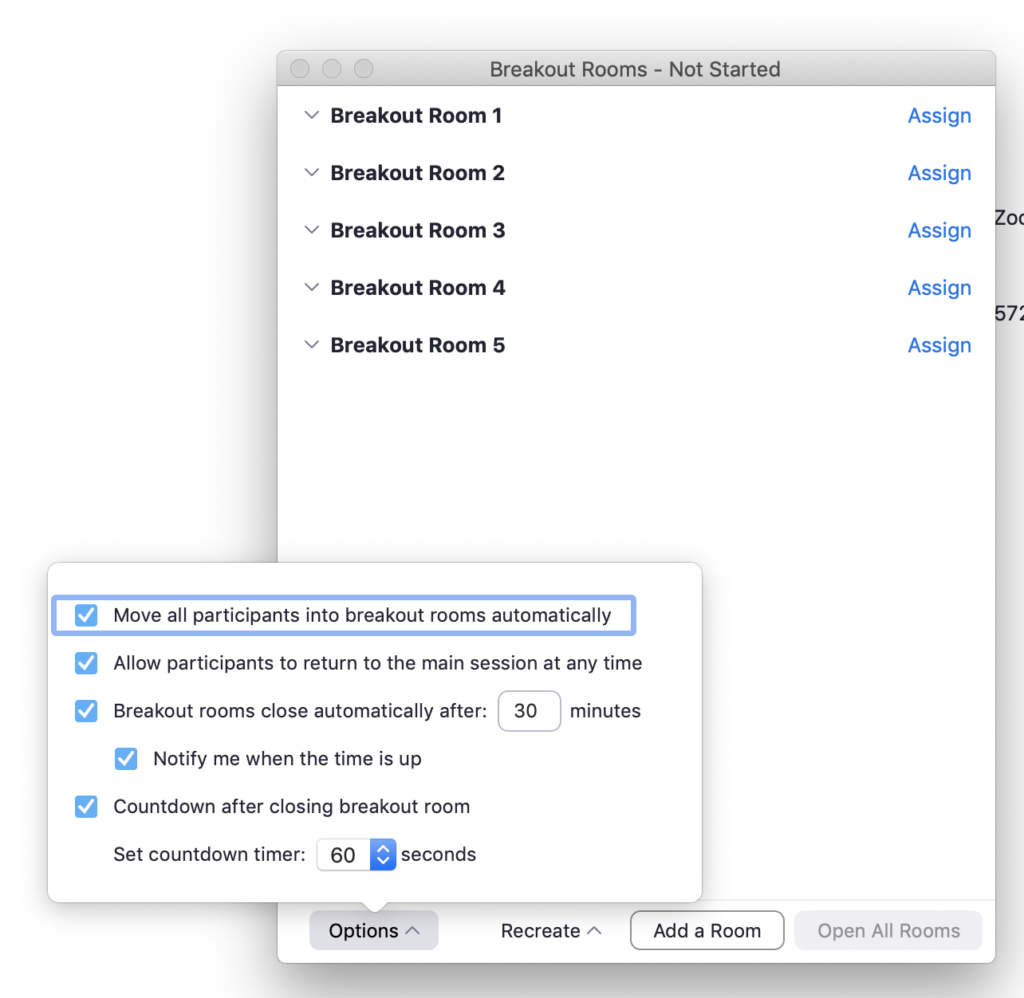
In the Breakout Room panel there is an Options menu with lots of handy features to help you create the ideal Breakout Room experience. These options include:
Move all participants to Breakout Rooms: this option automatically moves all those taking part in the class to a Breakout Room.
Open All Rooms option: This lets you create Breakout Rooms on the go.
Set a timer: This is a very handy option that lets you put your Breakout Rooms on a timer that will force everyone to return to the main session when the timer expires. This option is particularly good for group activities or brainstorming sessions.
Countdown after closing Breakout Rooms:
This option gives the students in Breakout Rooms a visible countdown to when they will return to the main session, giving them the time they need to finish their discussion.
Allow participants to return to the main session at any time:
This option gives students the ability to return to the main session without any time limits.

Bossing your Breakout Rooms…
Once all your students are in their Breakout Rooms, these features can help you manage the speed and rhythm of the sessions:
Self-select a Breakout Room: This new feature means a teacher can create Breakout Rooms and, within their class, give students the ability to self-select which room they would like to join without needing intervention from the host.
Co-hosting a Breakout Room:
Another new feature is the co-hosting privileges in Zoom, where co-hosts also have the ability to assign, start, and end Breakout Rooms, as well as the ability to move between Breakout Rooms and broadcast messages to all members of a Breakout Room.
Visiting rooms:
As a host or a co-host, you can jump between different Breakout Rooms.
Broadcasting a message:
This feature allows you to send a message to every Breakout Room. This is particularly useful if you want to give your students a warning that they need to wrap up their discussions.
Closing all rooms:
When you want to finish your breakout sessions, you can click “Close Rooms,” which will give students a warning notification that they need to rejoin the main class.
Sending students back to breakouts:
Once you close a breakout session, you can always decide to break your students into groups again. This is really useful for longer classes because you can split your students up as many times as you want.
Responding to help requests:
Students taking part in a Breakout Room can ask for help by clicking the “Ask for Help” icon to request that the teacher join a breakout room for assistance. The teacher will then get a notification and can jump into that particular session. However don’t forget if you’re recording your class to your cloud, it will only record the main classroom, even if the teacher is in another Breakout room. If the local recording is being used, it will record the room the participant who is recording is in. Multiple participants can record locally.
The future looks bright…
Finally it’s worth noting that Zoom also just added the ability to join Breakout Rooms from Zoom Rooms Appliances. While Zoom Rooms cannot initiate Breakout Room sessions, they can be added as Breakout Rooms participants when a host starts a breakout session. Zoom Rooms participants can join and leave the session and see who else is in their breakout.
This is especially helpful for teachers using Zoom Rooms-enabled classrooms and want to use the Breakout Rooms feature for group activities. Zoom also plan to support Breakout Rooms on Zoom Rooms for Windows, Mac, and Zoom Rooms for Touch later this year.
For more information on Breakout Rooms or any other features click here.